An SMTP server is essential for sending and receiving email. As a mail relay, it connects customers to other mail servers. A Windows SMTP server may benefit enterprises and organizations that need reliable email. Email delivery is granted enhanced control, security, and customization. Read on as we help you install and configure an SMTP server on your Windows machine for smooth, personalized email operations.
In order to avoid the installation and configuration of an SMTP server on Windows fails, all the requirements must be first made to be satisfied. Here is a list of the setup prerequisites and requirements that have to be fulfilled in order to make the installation process trouble-free and uncomplicated.
-
Download Windows Server 2016–2022. Download the right Windows Server version from Microsoft.
-
Internet Information Services (IIS) that incorporates an SMTP server. Although IIS is commonly included as standard on Windows Server editions, it may still require activation. Installation of the SMTP Server function is possible through the Server Manager or PowerShell.
-
A domain name or static IP address for the host. Other mail servers must have this information to identify and communicate with your SMTP server.
-
Valid SSL/TLS certificate (preferred but not necessary for secure email). A trusted Certificate Authority (CA) or a self-signed certificate may be used for testing.
Here are the steps that can help you install and change the SMTP server settings on Windows:
Step 1. Install SMTP Server
The process of installing the SMTP Server component on Windows is uncomplicated and can be performed via the Server Manager application. Here's how you can install the SMTP Server:
-
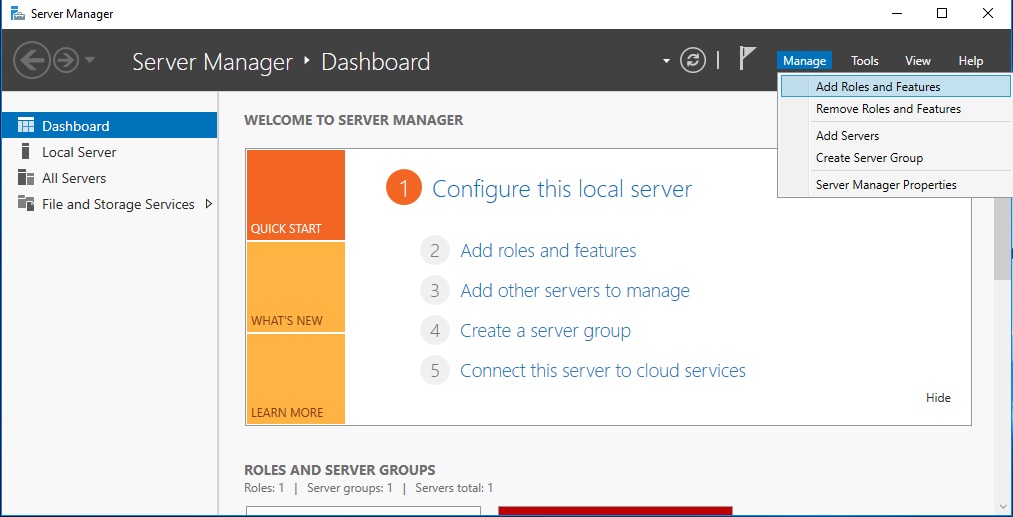
➔ Open Server Manager
Type Server Manager into the Windows start menu search bar. Click on it and launch the application.
-
➔ Add Roles and Features
In the Server Manager Dashboard, click on "Add roles and features". It will open a new window.

-
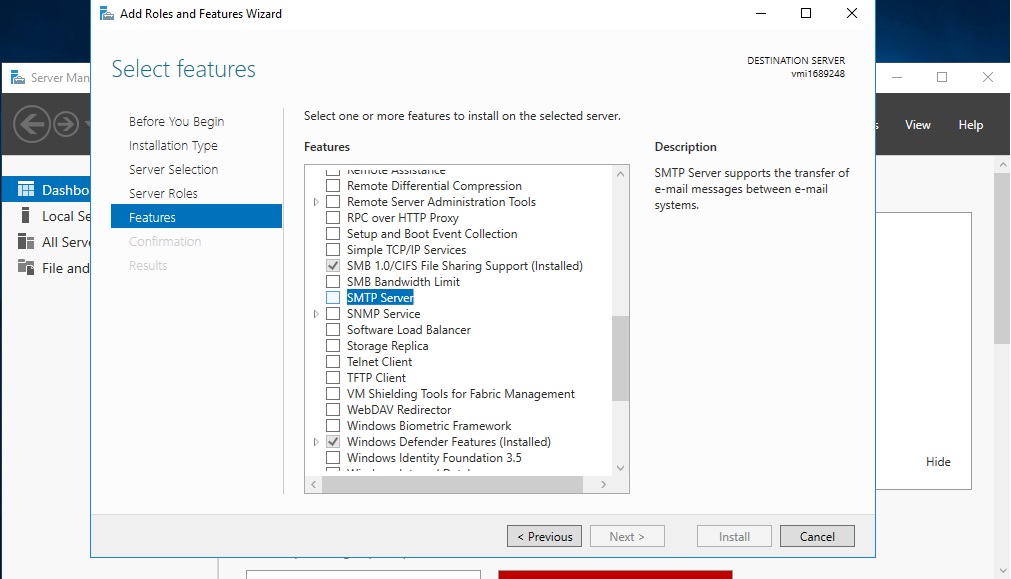
➔ Select Server Role
Click Next until you land on the Select Server Roles page. Scroll down to find the SMTP Server. Check the box next to it, and then click Next.

-
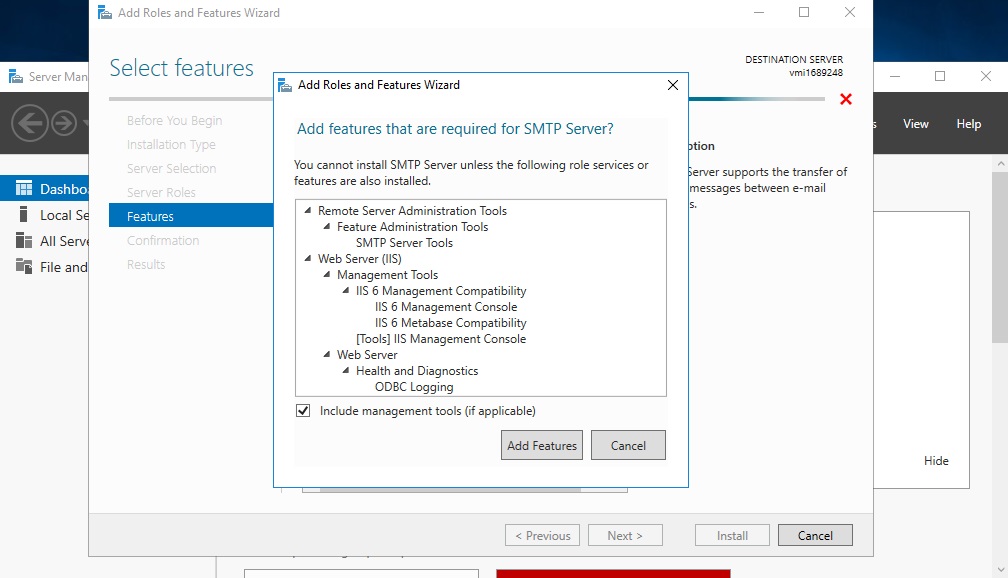
➔ Install Features
After selecting SMTP Server, a new window will pop up, asking you to install some additional features necessary for it. Click Add Features to install them.

-
➔ Confirm Installation Selections
Click the Next option until the Confirm installation options appear. After reviewing your options, click on the Install option.
-
➔ Installation Progress
The installation will now begin. It may take some time. Click Close after installation. You may be asked to specify your SMTP server's IP address or domain name during installation. Set the settings according to your network setup.
Step 2. Configure the SMTP Server
SMTP servers facilitate the transmission of emails from an application or system. It is critical to configure the SMTP server to guarantee dependable email delivery properly. Here is what you have to do:
-
Accessing SMTP Server Settings and Configuration Options
Nevertheless, the procedure for gaining access to SMTP server configurations can differ depending on the email client, operating system, or application being utilized. However, most email clients and applications handle email server configuration in a dedicated section.
Here's how you can access the SMTP server settings and configure the settings:
➔ Open IIS 6.0 from the Server Manager Dashboard and then select the Tools option.
➔ Select the Internet Information Services (IIS) 6.0 Manager from the drop-down menu.
➔ Now, a new window, the IINS Manager 6.0 window, will open up; expand the computer name and right-click on SMTP Virtual Server #1.
➔ Now, from the provided options, click on Properties.
-
Essential SMTP Server Settings
Configuring an SMTP server necessitates adjusting multiple parameters and options that enable secure and reliable email message delivery. Though the particular settings might be different for your organization or the email platform you're using, certain essential settings must be configured appropriately.
➔ Relay Restrictions: Authorize IP addresses or networks to send emails using your SMTP server. Enabling this security feature protects your server against spammers and dangerous actors. Under the Access Tab, select the Relay option, and then click on Add. Tick the Single Computer option and enter 127.0.0.1 (IP Address) to allow the local host to relay the emails through your SMTP server. You can even specify a group of computers using the Group of Computers option. Click on OK to confirm the changes.
➔ Security Options:Click on the Delivery Tab. It contains different settings related to the retrying intervals to send outbound emails after a failed delivery, and many security options. Now, click on the Outbound security options and choose one out of the four options:
-
Anonymous Access (it will turn off SMTP server authentication as it does not require an account name or password).
-
Basic Authentication (it is used to send emails to personal or exchange accounts, and you’ll be required to use TLS encryption if you select this option).
-
Integrated Windows Authentication (it will use Windows account name and password for authentication).
-
TLS Encryption (it will require you to install a valid SSL certificate on the server as it will use TLS to secure the connection).
-
Restart the SMTP Server
Right-click on SMTP Virtual Server #1, click on the Stop option, and click on the Start option to save the changes and restart the SMTP Server.
Step 3: Test and Troubleshoot
After configuring the SMTP server, email delivery and operation must be tested. For testing and troubleshooting the SMTP server, follow these steps:
-
Send Test Emails
Employ a testing utility such as mail-tester or smtp-tester in conjunction with an email client to dispatch test emails via the configured SMTP server. Confirm that the designated recipients are receiving the emails. One of the ways is to use Telnet, and here’s how you can do it:
1. Press the Windows Key and open the PowerShell application.
2. Now, run the PowerShell as Administrator and run the following command:
Telnet localhost 25.
3. Start the communication with the server by writing:
EHLO Server
4. Enter the sender’s email address that you will use to send the email address. Follow the given syntax:
MAIL FROM: mentionthesenderemail@domain.com
5. Enter the recipient's email address. Follow the given syntax:
RCPT TO: mentiontherecipientemail@domain.com
6. Inform the SMTP server that you are ready to send the message by writing:
DATA
7. Now, write the email subject.
Subject: Test Message 1
8. Press ENTER twice to move on to write the email body or message. Click on ENTER once again after you are done writing the email.
9. Now, enter a period (.) to send the email and then press ENTER.
.
10. Now, see if the recipient has received the email. If not, then it must be in the SMTP queued directory, which you can access by clicking on C: folder in File Explorer > inetpub > mailroot > Queue.
-
Check Logs
Observe the logs of the SMTP server for any errors or alerts that could offer valuable insights into possible complications. Observe connection failures, unsuccessful authentication attempts, and other pertinent error messages.
-
Verify Configurations
It is advisable to verify the SMTP server configurations thoroughly, encompassing the email domains, encryption protocols, relay restrictions, and authentication settings. It is imperative to verify that every configuration is accurate and uniform throughout various components or applications.
-
Test from Different Locations
Send test emails from different networks or locations to confirm that the SMTP server is available and operational from several sources.
Windows SMTP server installation and configuration requires meticulous planning and attention to detail. However, one can effectively establish a dependable and secure SMTP server to cater to the email communication requirements of an organization.
It is crucial to comprehensively test and troubleshoot the configuration in order to guarantee uninterrupted email delivery. By implementing proper configuration and ensuring regular maintenance, an SMTP server can deliver an email infrastructure that is both secure and efficient.